Friday, January 15, 2010
Scanner Pro for the iPhone, a Review
Posted by Jeff Campbell in "Apple Software (iPhone/iPod Touch)" @ 10:00 AM
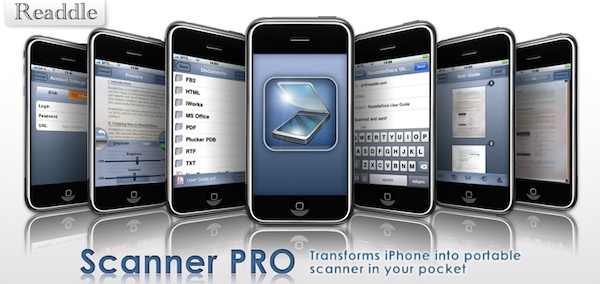
The Claim: "Scanner Pro transforms iPhone into portable scanner in your pocket. It lets you scan multipage documents, send them by email and even upload to MobileMe iDisk or any other WebDAV enabled server. You can also transfer scanned document to desktop computer over Wi-Fi and transform it into editable MS Word file with OCR tool of your choice. Scanner Pro easily handles situations when you have printed document that should be send by email and there is no scanner nearby. The application incorporates special algorithms that enhance image quality to make it as readable as possible."
The App: Readdle has come out with an application that they claim turns your iPhone into a portable scanner. But can it really compare to a scanner in quality? We shall see!
The Details: Scanner Pro is an application that uses your iPhone camera to take photos or "scans" of documents, in turn creating a PDF. You can then adjust the scan and send it via email, save to Evernote, store in DropBox, upload to iDisk/WebDAV or just store on your iPhone or in iPhoto. You can also password protect the scan to keep sensitive documents away from prying eyes. The process is very simple.
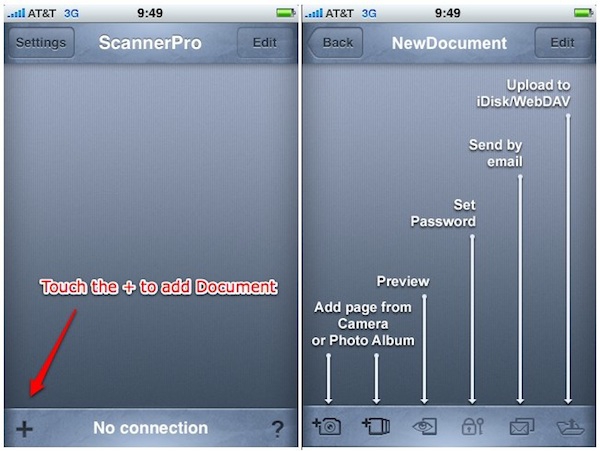
When you want to scan a document, just open the application and touch the "+" sign. This takes you to the screen on the right, where you can either take a new picture or scan, or use one you have stored previously on your iPhone. If you take a picture, you then go to the "Preview" screen where you can either use the photo/scan, or if it isn't to your liking you can just delete it and take another one. Once you select your "scan," you move to the processing step.
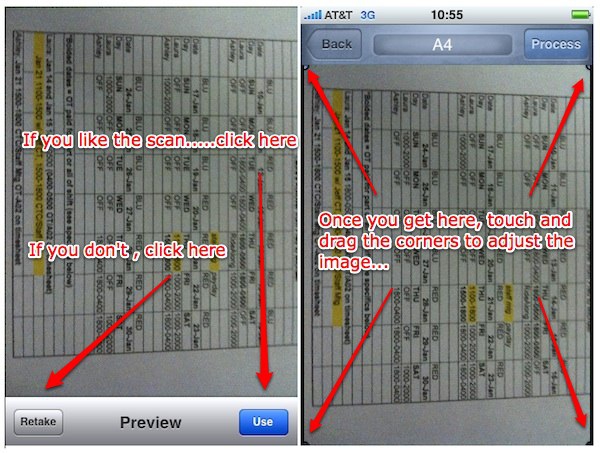
Don't worry too much about brightness or contrast at this step, you will have a chance to fix it later. At this stage just make sure the scan is legible to your liking. If it isn't, hit the retake button and start over. Once you click the "USE" button in the above image on the left, then you move to the processing stage, which is the image on the right side. Basically this is where you can even up the corners if you so choose, depending on how you want it to look. Once you get it aligned, touch the "PROCESS" button on upper right of your screen and it saves your scan and takes you to the "Preview" screen.
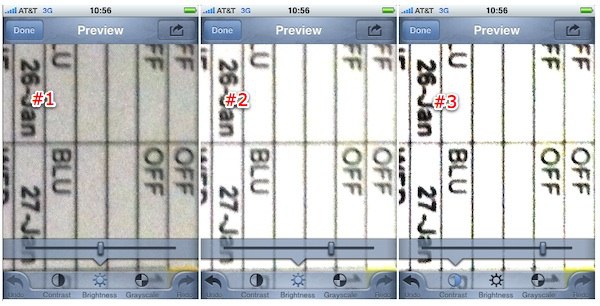
This is the last screen before you actually save the scan, where you can adjust the contrast, brightness and grayscale, all by simply sliding the bar at the bottom of the screen. Touch any of the three choices to highlight it in blue (see #1 Brightness button), then move slider to adjust that aspect. Once you slide it, it takes a second or two to take effect so move the bar in small adjustments until you get it where you like it. You can see in image #1 the original, #2 is after adjusting the brightness, and in image #3 you can see the outcome after making a contrast adjustment. You can take a pretty dark scan and make it readable with this step. Once you are finished here, you can either click on the "Done" button at the top left of the screen to get back to the main or "New Document" screen, or you can send it off to Evernote or your iPhoto library by clicking on the upper right button with the arrow on it.
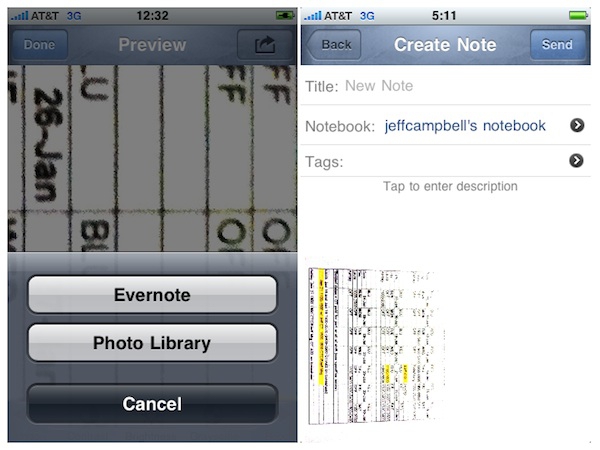
If you do choose the Evernote option, Scanner Pro sets it up for you so you can add tags and a title to the document before you upload. They also give you the option of choosing which notebook you want to upload too, as well as picking from your currently used tags in your Evernote account. The interface for using Evernote is very clean and works perfectly in all my testing. I use Evernote a lot to save documents, receipts, etc, so having this as another tool to use with that program is great. If you don't use this option and instead click on the "Done" button you go back to the "New Document" or main screen that lists all of your scans.
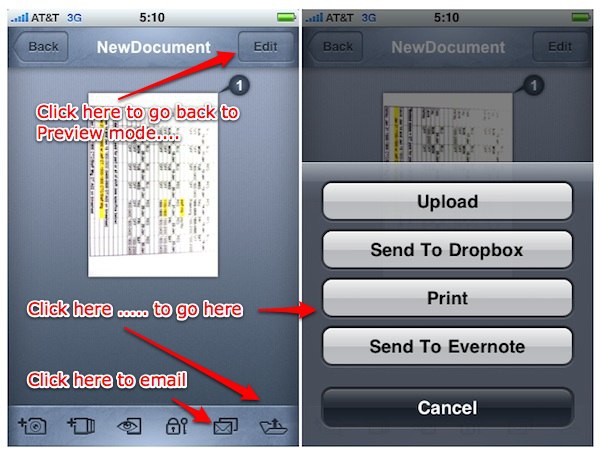
At this page you will see all of your scans listed, and it is also where you can email them, save them to DropBox, print them (as long as you have a separate app called "Print n Share" installed), upload to iDisk/WebDAV or again send to your Evernote account. You can also go back into Preview mode with any of your documents to re-adjust them simply by tapping on the document.
The Verdict: While you won't get the quality from this as you would from a standalone scanner, the output is actually quite usable and it gives you plenty of options for delivery. It reminds me of the motto of Best Camera, in that in this case, the best scanner for the job is the one that you have with you. And this fits the bill. This is a great tool to add to your iPhone toolbox for those times when you need a copy but can't get to a scanner. No worries, you have one right on your iPhone!
Jeff Campbell is a fan of all things Apple, an X-boxer (the 360 kind) and geek. He works as a floor supervisor in a 911 center in the Portland, OR area, and lives in a small town just north of Mt. Hood with his wife, two kids, two dogs, a snake and a tarantula. Oh, and a three legged cat named "Tres."


